Join Our Newsletter for Cozy Home Inspiration, Family Fun, and Delicious Recipes Every Week
12 Amazing and Creative Homemade Cake Recipes
Who doesn’t love a homemade cake? There’s just something special about baking from scratch the aroma filling your kitchen, the excitement of that first slice, and, of course, the incredible taste. Whether you’re a pro baker or just starting out, making a cake at home is always a fun and rewarding experience.
If you’re looking for fresh inspiration, you’re in the right place! From classic flavors to unique twists, these homemade cake recipes are anything but boring. Think rich chocolate layers, fruity delights, and even some unexpected ingredient combos that will surprise you in the best way.

Get ready to whip up something amazing! Below, you’ll find 12 creative and delicious homemade cake recipes that will impress your family and friends. Let’s get baking!
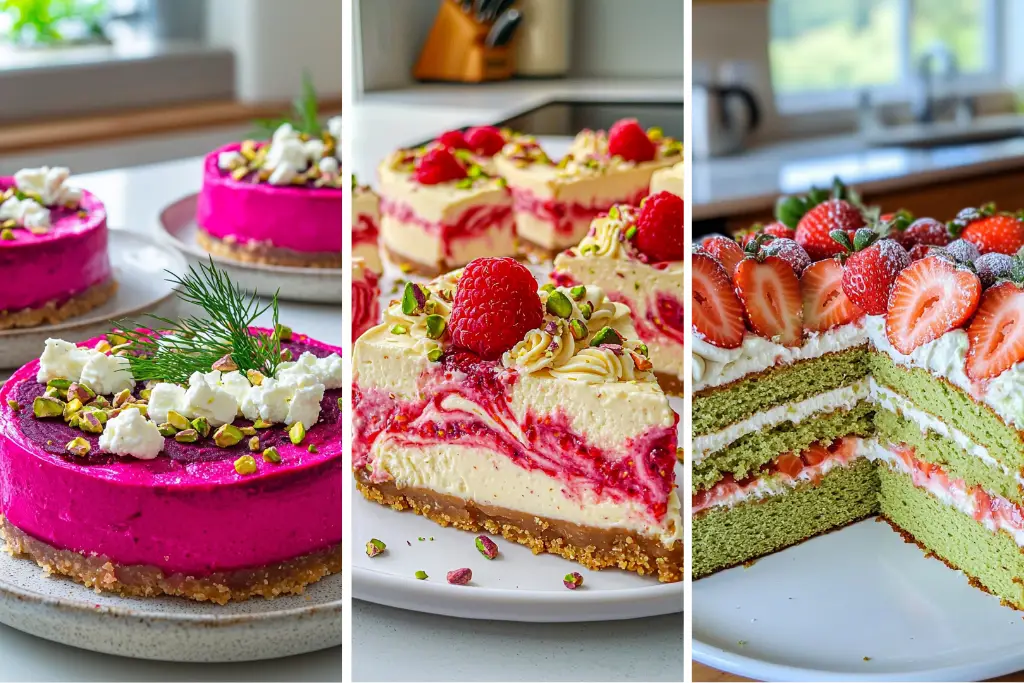
12 Beetroot Cheesecake A Savory Delight for Elegant Gatherings

Ingredients:
For the Crust:
150g crackers or digestive biscuits
60g unsalted butter, melted
1/2 tsp salt
For the Beetroot Cheesecake Filling:
250g cooked beetroot, pureed
200g cream cheese
100g Greek yogurt
2 tbsp lemon juice
1 clove garlic, minced
1/2 tsp salt
1/2 tsp black pepper
1 1/2 tsp gelatin powder
2 tbsp warm water
For Topping and Garnish:
50g crumbled feta cheese
30g chopped pistachios
A few sprigs of fresh dill
Thinly sliced roasted beetroot (optional)
Instructions:
Step 1: Prepare the Crust
Crush the crackers or biscuits into fine crumbs using a food processor or by placing them in a ziplock bag and crushing them with a rolling pin.
In a bowl, mix the crumbs with melted butter and salt until well combined.
Press the mixture firmly into the base of a springform pan (or small ring molds for individual servings).
Refrigerate for at least 20 minutes to set.
Step 2: Make the Beetroot Filling
In a blender, combine the pureed beetroot, cream cheese, Greek yogurt, lemon juice, garlic, salt, and black pepper. Blend until smooth.
Dissolve the gelatin in warm water and stir until fully dissolved.
Add the dissolved gelatin to the beetroot mixture and blend again until well incorporated.
Pour the filling over the chilled crust and smooth the top with a spatula.
Refrigerate for at least 4 hours or until fully set.
Step 3: Decorate and Serve
Once the cheesecake is set, carefully remove it from the pan.
Arrange crumbled feta cheese over the top for a tangy contrast.
Sprinkle chopped pistachios for a crunchy texture.
Garnish with fresh dill sprigs for a burst of color and freshness.
Optionally, add thinly sliced roasted beetroot on top for an elegant finish.
Decoration Tips:
Color Balance: The vibrant pink beetroot filling pairs beautifully with the white feta, green pistachios, and fresh dill. Keep the toppings balanced and not overly crowded.
Texture Variation: Combining soft, creamy elements with crunchy nuts creates a more visually appealing and satisfying bite.
Plate Presentation: Serve on neutral-colored plates to let the vibrant colors of the cheesecake shine. A speckled ceramic plate enhances the artisanal look.
Layered Look: If making mini cheesecakes, ensure clean layers by pressing the crust evenly and smoothing the filling carefully.
Extra Touch: A drizzle of honey or balsamic glaze can add a glossy finish while enhancing the flavor contrast.
11 Raspberry Swirl Cheesecake A Lush Treat for Sweet Indulgence

Ingredients:
For the Crust:
200g digestive biscuits or graham crackers
80g unsalted butter, melted
1 tbsp brown sugar
For the Cheesecake Filling:
500g cream cheese, softened
200g heavy cream
150g powdered sugar
2 tsp vanilla extract
1 tbsp lemon juice
1 1/2 tsp gelatin powder
2 tbsp warm water
For the Raspberry Swirl:
150g fresh raspberries
2 tbsp granulated sugar
1 tsp lemon juice
For Decoration:
50g chopped pistachios
Fresh raspberries
Piped whipped cream or cream cheese frosting
Instructions:
Step 1: Prepare the Crust
Crush the digestive biscuits into fine crumbs using a food processor or by placing them in a sealed bag and crushing them with a rolling pin.
Mix the crumbs with melted butter and brown sugar until well combined.
Press the mixture firmly into the base of a springform pan.
Refrigerate for at least 30 minutes to set.
Step 2: Make the Raspberry Swirl
In a small saucepan over medium heat, combine raspberries, sugar, and lemon juice.
Cook while stirring, mashing the raspberries slightly, until the mixture thickens about 5 minutes.
Strain through a fine mesh sieve to remove seeds if desired, then let it cool completely.
Step 3: Prepare the Cheesecake Filling
In a mixing bowl, beat the softened cream cheese, powdered sugar, vanilla extract, and lemon juice until smooth.
In a separate bowl, whip the heavy cream until stiff peaks form.
Dissolve the gelatin powder in warm water and mix until fully dissolved.
Fold the whipped cream into the cream cheese mixture gently.
Add the dissolved gelatin and mix until fully incorporated.
Step 4: Assemble the Cheesecake
Pour half of the cheesecake filling over the chilled crust.
Spoon small amounts of the raspberry sauce over the filling and use a skewer or knife to swirl it through.
Repeat with the remaining cheesecake filling and more raspberry sauce, creating a marbled effect.
Smooth the top and refrigerate for at least 6 hours or overnight until set.
Step 5: Decorate and Serve
Once set, carefully remove the cheesecake from the pan.
Pipe whipped cream or cream cheese frosting along the edges for a decorative touch.
Garnish with fresh raspberries for a vibrant, natural look.
Sprinkle chopped pistachios for added crunch and color contrast.
Decoration Tips:
Swirl Effect: Use a toothpick or skewer to gently swirl the raspberry sauce for a natural marbled look. Avoid overmixing to maintain contrast.
Balanced Toppings: Place raspberries evenly for a visually appealing presentation, ensuring each slice gets a beautiful topping.
Texture Variety: The crunch of pistachios adds an exciting contrast to the creamy cheesecake. Toasting them enhances their flavor.
Elegant Piping: A simple whipped cream border makes the cake look refined and festive. Use a star tip for a delicate, professional touch.
Serving Plate Choice: A white plate enhances the contrast of colors, making the vibrant red raspberries and green pistachios pop beautifully.
10 Strawberry Shortcake

Ingredients:
For the Shortcake Base:
2 cups all-purpose flour
1/4 cup granulated sugar
1 tablespoon baking powder
1/2 teaspoon salt
1/2 cup unsalted butter, cold and cubed
3/4 cup heavy cream
1 teaspoon vanilla extract
1 large egg
For the Whipped Cream Filling:
2 cups heavy whipping cream, chilled
1/2 cup powdered sugar
1 teaspoon vanilla extract
For the Strawberry Topping:
2 1/2 cups fresh strawberries, hulled and sliced
1/4 cup granulated sugar
1 tablespoon lemon juice
Instructions:
Prepare the Shortcake:
Preheat the oven to 375°F (190°C). Grease and line a round cake pan with parchment paper.
In a large bowl, whisk together the flour, sugar, baking powder, and salt.
Cut in the cold butter using a pastry cutter or fork until the mixture resembles coarse crumbs.
In a separate bowl, whisk together the heavy cream, vanilla extract, and egg. Add to the dry ingredients and stir until just combined.
Transfer the dough to the prepared pan, pressing it evenly.
Bake for 18–22 minutes or until golden brown. Let it cool completely.
Prepare the Strawberry Filling:
In a bowl, mix the sliced strawberries with sugar and lemon juice. Let them sit for 15–20 minutes to release their juices.
Make the Whipped Cream:
In a chilled mixing bowl, beat the heavy whipping cream, powdered sugar, and vanilla extract on high speed until stiff peaks form.
Assemble the Shortcake:
Slice the cooled shortcake horizontally into two layers.
Spread a generous layer of whipped cream over the bottom layer, followed by half of the macerated strawberries.
Place the top layer over the filling and cover the entire cake with the remaining whipped cream.
Decoration Tips:
For an elegant finish, use a piping bag with a star tip to create swirls around the edges of the cake.
For a fresh look, arrange whole or halved strawberries on top, slightly overlapping for a decorative pattern.
For extra shine, lightly brush the strawberries with a glaze made by heating a spoonful of apricot jam with a bit of water.
For a rustic touch, sprinkle crushed shortbread cookies or graham crackers around the base of the cake.
For best results, refrigerate the cake for at least 30 minutes before serving to set the layers properly.
9 Matcha Strawberry Cake A Delightful Treat for Every Celebration

Ingredients:
For the Matcha Sponge Cake:
250g all-purpose flour
2 tbsp matcha powder
2 tsp baking powder
1/2 tsp salt
200g granulated sugar
4 large eggs
120ml vegetable oil
180ml whole milk
1 tsp vanilla extract
1 tbsp lemon juice
For the Whipped Cream Filling:
400ml heavy whipping cream
50g powdered sugar
1 tsp vanilla extract
For the Strawberry Layer:
200g fresh strawberries, sliced
1 tbsp sugar
1 tsp lemon juice
For Decoration:
Fresh whole and halved strawberries
Extra whipped cream for piping
Powdered sugar for dusting
Instructions:
Step 1: Prepare the Matcha Sponge Cake
Preheat your oven to 175°C (350°F). Grease and line three 8-inch cake pans with parchment paper.
In a bowl, sift together the flour, matcha powder, baking powder, and salt. Set aside.
In another large bowl, whisk the eggs and sugar until pale and fluffy.
Add the vegetable oil, vanilla extract, and lemon juice, and mix well.
Gradually alternate adding the dry ingredients and milk, mixing until just combined. Avoid overmixing.
Divide the batter evenly among the three cake pans.
Bake for 18-22 minutes or until a toothpick inserted in the center comes out clean.
Let the cakes cool in the pans for 10 minutes, then transfer to a wire rack to cool completely.
Step 2: Prepare the Whipped Cream Filling
In a cold mixing bowl, whip the heavy cream, powdered sugar, and vanilla extract until stiff peaks form.
Keep the whipped cream chilled until ready to use.
Step 3: Prepare the Strawberry Layer
Toss the sliced strawberries with sugar and lemon juice. Let them sit for 10 minutes to release juices.
Step 4: Assemble the Cake
Place one matcha sponge layer on a cake stand.
Spread a generous layer of whipped cream and arrange strawberry slices on top.
Repeat with the second cake layer, adding more whipped cream and strawberries.
Place the final cake layer on top and cover the entire cake with a smooth layer of whipped cream.
Step 5: Decorate and Serve
Pipe extra whipped cream along the edges for a decorative touch.
Arrange fresh strawberries on top, alternating whole and halved berries for visual appeal.
Lightly dust with powdered sugar for an elegant finish.
Chill for at least 1 hour before slicing to set the layers.
Decoration Tips:
Even Layering: Use a serrated knife to trim the cake layers for a smooth, professional look.
Perfect Whipped Cream: Keep the bowl and beaters chilled before whipping to achieve stiff peaks.
Strawberry Arrangement: Place whole strawberries in the center and halved ones around the edges for a balanced look.
Elegant Dusting: A fine sieve helps create a delicate powdered sugar effect without clumps.
Serving Style: Present the cake on a simple white or wooden cake stand to enhance its vibrant colors.
8 Strawberry Vanilla Cake A Delightful Treat for Every Celebration

Ingredients:
For the Vanilla Sponge Cake:
250g all-purpose flour
2 ½ tsp baking powder
½ tsp salt
200g granulated sugar
4 large eggs
120ml vegetable oil
180ml whole milk
1 tsp vanilla extract
1 tbsp lemon juice
For the Strawberry Filling:
200g fresh strawberries, chopped
2 tbsp granulated sugar
1 tsp lemon juice
1 tbsp cornstarch mixed with 2 tbsp water
For the Whipped Cream Frosting:
400ml heavy whipping cream
50g powdered sugar
1 tsp vanilla extract
For Decoration:
Whole and halved fresh strawberries
Powdered sugar for dusting
Extra whipped cream for piping
Instructions:
Step 1: Prepare the Vanilla Sponge Cake
Preheat your oven to 175°C (350°F). Grease and line three 8-inch cake pans with parchment paper.
In a bowl, sift together the flour, baking powder, and salt. Set aside.
In another large bowl, whisk the eggs and sugar until pale and fluffy.
Add the vegetable oil, vanilla extract, and lemon juice, and mix well.
Gradually alternate adding the dry ingredients and milk, mixing until just combined. Avoid overmixing.
Divide the batter evenly among the three cake pans.
Bake for 18-22 minutes or until a toothpick inserted in the center comes out clean.
Let the cakes cool in the pans for 10 minutes, then transfer to a wire rack to cool completely.
Step 2: Prepare the Strawberry Filling
In a small saucepan, combine the chopped strawberries, sugar, and lemon juice.
Cook over medium heat, stirring occasionally, until the strawberries soften and release their juices (about 5 minutes).
Add the cornstarch mixture and continue to cook until the filling thickens.
Remove from heat and let it cool completely before using.
Step 3: Prepare the Whipped Cream Frosting
In a cold mixing bowl, whip the heavy cream, powdered sugar, and vanilla extract until stiff peaks form.
Keep the whipped cream chilled until ready to use.
Step 4: Assemble the Cake
Place one vanilla sponge layer on a cake stand.
Spread a layer of whipped cream, followed by a generous amount of the strawberry filling.
Repeat with the second cake layer, adding more whipped cream and strawberries.
Place the final cake layer on top and cover the entire cake with a smooth layer of whipped cream.
Step 5: Decorate and Serve
Pipe extra whipped cream along the edges for a decorative touch.
Arrange fresh strawberries on top, alternating whole and halved berries for visual appeal.
Lightly dust with powdered sugar for an elegant finish.
Chill for at least 1 hour before slicing to set the layers.
Decoration Tips:
Perfectly Layered Cake: Trim the cake layers with a serrated knife for a smooth, even look.
Cream Stability: Keep the whipped cream cold to maintain a fluffy texture and clean finish.
Balanced Strawberry Arrangement: Place whole strawberries in the center and halved ones around the edges for a natural, professional presentation.
Elegant Powdered Sugar Dusting: Use a fine sieve to evenly sprinkle the sugar over the strawberries for a delicate finish.
Serving Style: Present the cake on a simple white plate or a wooden cake stand to highlight its colors.
7 Chocolate Strawberry Cake A Decadent Delight for Every Occasion

Ingredients:
For the Chocolate Cake:
250g all-purpose flour
75g unsweetened cocoa powder
2 ½ tsp baking powder
½ tsp salt
200g granulated sugar
4 large eggs
120ml vegetable oil
180ml whole milk
120ml hot coffee (or hot water)
1 tsp vanilla extract
For the Chocolate Whipped Cream Filling:
400ml heavy whipping cream
50g powdered sugar
2 tbsp cocoa powder
1 tsp vanilla extract
For the Chocolate Ganache Frosting:
200g dark chocolate, chopped
200ml heavy cream
1 tbsp butter (for extra shine)
For Decoration:
Fresh whole and halved strawberries
Extra whipped chocolate cream for piping
Cocoa powder for dusting
Instructions:
Step 1: Prepare the Chocolate Cake
Preheat your oven to 175°C (350°F). Grease and line three 8-inch cake pans with parchment paper.
In a bowl, sift together the flour, cocoa powder, baking powder, and salt. Set aside.
In another large bowl, whisk the eggs and sugar until pale and fluffy.
Add the vegetable oil, vanilla extract, and milk, and mix well.
Gradually alternate adding the dry ingredients and hot coffee, mixing until just combined. Avoid overmixing.
Divide the batter evenly among the three cake pans.
Bake for 20-25 minutes or until a toothpick inserted in the center comes out clean.
Let the cakes cool in the pans for 10 minutes, then transfer to a wire rack to cool completely.
Step 2: Prepare the Chocolate Whipped Cream Filling
In a cold mixing bowl, whip the heavy cream, powdered sugar, cocoa powder, and vanilla extract until stiff peaks form.
Keep the whipped cream chilled until ready to use.
Step 3: Prepare the Chocolate Ganache Frosting
Heat the heavy cream in a saucepan over low heat until just steaming (do not boil).
Pour over the chopped chocolate and let sit for 1-2 minutes.
Stir gently until the chocolate is fully melted and smooth. Add butter for extra shine.
Let the ganache cool slightly until it reaches a spreadable consistency.
Step 4: Assemble the Cake
Place one chocolate cake layer on a cake stand.
Spread a layer of chocolate whipped cream evenly over the cake.
Repeat with the second cake layer, adding more whipped cream.
Place the final cake layer on top and spread a thin crumb coat of ganache over the entire cake.
Chill for 15 minutes, then apply a final smooth layer of ganache.
Step 5: Decorate and Serve
Pipe extra chocolate whipped cream along the edges for an elegant touch.
Arrange fresh strawberries on top, alternating whole and halved berries for contrast.
Lightly dust with cocoa powder for a rich finish.
Chill for at least 1 hour before slicing to set the layers.
Decoration Tips:
Smooth Ganache Finish: Use a spatula to spread the ganache evenly for a sleek, glossy look.
Whipped Cream Piping: Pipe delicate swirls of chocolate cream along the top edge for a bakery-style appearance.
Strawberry Placement: Arrange whole strawberries at the center and halved ones around the edges for a beautiful presentation.
Cocoa Powder Dusting: Lightly dust with cocoa powder for an elegant, rich effect.
Serving Style: Present the cake on a white or dark ceramic plate to highlight its deep chocolate color.
6 Strawberry Crunch Cake A Creamy Delight for Every Celebration

Ingredients:
For the Cake Base:
200g all-purpose flour
1 ½ tsp baking powder
½ tsp salt
150g granulated sugar
100g unsalted butter, softened
2 large eggs
120ml whole milk
1 tsp vanilla extract
For the Strawberry Cream Filling:
250g fresh strawberries, chopped
200g cream cheese, softened
100g powdered sugar
300ml heavy whipping cream
1 tsp vanilla extract
For the Whipped Cream Topping:
300ml heavy whipping cream
50g powdered sugar
1 tsp vanilla extract
For the Crunch Topping:
100g crushed shortbread cookies or vanilla wafer cookies
50g melted butter
1 tbsp brown sugar
For Decoration:
Fresh strawberry slices
Extra whipped cream for piping
Instructions:
Step 1: Prepare the Cake Base
Preheat your oven to 175°C (350°F). Grease and line an 8-inch cake pan.
In a bowl, whisk together the flour, baking powder, and salt. Set aside.
In another large bowl, beat the butter and sugar until light and fluffy.
Add the eggs one at a time, mixing well after each addition. Stir in the vanilla extract.
Gradually alternate adding the dry ingredients and milk, mixing until just combined. Avoid overmixing.
Pour the batter into the prepared cake pan and bake for 20-25 minutes or until a toothpick inserted in the center comes out clean.
Let the cake cool completely before slicing it into two equal layers.
Step 2: Prepare the Strawberry Cream Filling
In a bowl, beat the cream cheese and powdered sugar until smooth.
In another bowl, whip the heavy cream and vanilla extract until stiff peaks form.
Gently fold the whipped cream into the cream cheese mixture.
Stir in the chopped strawberries. Keep chilled until ready to use.
Step 3: Prepare the Crunch Topping
In a bowl, mix the crushed cookies, melted butter, and brown sugar until combined.
Spread the mixture on a lined baking sheet and bake at 175°C (350°F) for 5 minutes.
Let it cool completely before using.
Step 4: Assemble the Cake
Place one cake layer on a serving plate.
Spread half of the strawberry cream filling evenly over the cake.
Add the second cake layer on top and spread the remaining strawberry cream filling.
Cover the entire cake with a smooth layer of whipped cream.
Step 5: Decorate and Serve
Pipe whipped cream swirls around the edges.
Sprinkle the crunch topping generously over the top.
Arrange fresh strawberry slices in an elegant pattern.
Chill for at least 1 hour before slicing to set the layers.
Decoration Tips:
Perfectly Layered Cake: Trim the cake layers for a clean, even look before assembling.
Whipped Cream Stability: Keep the whipped cream cold before piping for neat swirls.
Crunch Effect: Add the cookie crunch just before serving to maintain its texture.
Strawberry Arrangement: Layer whole and halved strawberries for a dynamic presentation.
Serving Style: Present the cake on a white or glass plate to highlight its colors beautifully.
5 Terrazzo Cheesecake A Stunning Delight for Every Occasion

Ingredients:
For the Crust:
200g digestive biscuits or graham crackers
80g unsalted butter, melted
1 tbsp brown sugar
For the Chocolate Layer (Optional):
150g dark chocolate, melted
50ml heavy cream
For the Cheesecake Filling:
400g cream cheese, softened
150g powdered sugar
1 tsp vanilla extract
200ml heavy whipping cream
2 ½ tsp gelatin powder
3 tbsp warm water
For the Terrazzo Effect:
100g assorted fruit jellies (various colors)
30g chopped dark chocolate
Edible gold flakes or gold sugar (optional)
Instructions:
Step 1: Prepare the Crust
Crush the digestive biscuits into fine crumbs using a food processor or rolling pin.
Mix the crumbs with melted butter and brown sugar until well combined.
Press the mixture firmly into the base of a springform pan.
Refrigerate for at least 20 minutes to set.
Step 2: Prepare the Chocolate Layer (Optional)
Heat the heavy cream until warm but not boiling.
Pour over the melted chocolate and stir until smooth.
Spread evenly over the chilled biscuit base and return to the fridge.
Step 3: Make the Cheesecake Filling
Sprinkle gelatin over warm water and let it bloom for 5 minutes.
In a mixing bowl, beat the softened cream cheese, powdered sugar, and vanilla extract until smooth.
In another bowl, whip the heavy cream until soft peaks form.
Melt the bloomed gelatin in the microwave for 10 seconds and stir it into the cream cheese mixture.
Gently fold in the whipped cream until fully combined.
Step 4: Assemble the Cheesecake
Pour half of the cheesecake filling over the chilled base.
Scatter some of the fruit jellies into the mixture and gently swirl.
Pour the remaining cheesecake filling on top and smooth the surface.
Press additional fruit jellies into the top layer for a terrazzo effect.
Refrigerate for at least 6 hours or overnight to fully set.
Step 5: Decorate and Serve
Sprinkle chopped dark chocolate and edible gold flakes for an elegant touch.
Let the cheesecake sit at room temperature for 10 minutes before slicing.
Serve chilled for the best texture and flavor.
Decoration Tips:
Terrazzo Pattern: Use a mix of different colored jellies for a mosaic-like effect.
Smooth Finish: Use an offset spatula to level the cheesecake before setting.
Gold Accents: A touch of edible gold adds a luxurious finish.
Chocolate Contrast: Dark chocolate shavings or chunks provide a beautiful color contrast.
Serving Style: Plate on a neutral-toned plate to make the terrazzo design stand out.
4 Strawberry Swiss Roll A Light Delight for Every Occasion

Ingredients:
For the Sponge Cake:
120g all-purpose flour
1 tsp baking powder
¼ tsp salt
4 large eggs
150g granulated sugar
1 tsp vanilla extract
2 tbsp vegetable oil
2 tbsp milk
For the Strawberry Filling:
200g fresh strawberries, chopped
2 tbsp granulated sugar
1 tsp lemon juice
For the Whipped Cream Filling:
300ml heavy whipping cream
50g powdered sugar
1 tsp vanilla extract
For Decoration:
Whole and sliced fresh strawberries
Extra whipped cream for piping
Powdered sugar for dusting
Strawberry jam (optional)
Instructions:
Step 1: Prepare the Sponge Cake
Preheat your oven to 180°C (350°F). Line a 10×15-inch baking tray with parchment paper.
In a bowl, whisk together flour, baking powder, and salt. Set aside.
In a large bowl, beat the eggs and sugar until pale and fluffy about 5 minutes.
Add vanilla extract, vegetable oil, and milk, and mix until combined.
Gently fold in the dry ingredients until just incorporated. Avoid overmixing.
Pour the batter evenly onto the prepared baking tray and spread it out smoothly.
Bake for 10-12 minutes, or until the sponge is lightly golden and springs back when touched.
Step 2: Roll the Cake
While the cake is still warm, place a clean kitchen towel over it and gently roll it up with the parchment paper inside.
Let it cool completely in the rolled shape to prevent cracks.
Step 3: Prepare the Strawberry Filling
Toss the chopped strawberries with sugar and lemon juice. Let them sit for 10 minutes to release juices.
Step 4: Make the Whipped Cream
In a cold mixing bowl, whip the heavy cream, powdered sugar, and vanilla extract until stiff peaks form.
Step 5: Assemble the Swiss Roll
Carefully unroll the cooled sponge cake and remove the parchment paper.
Spread a layer of whipped cream evenly across the cake.
Sprinkle the macerated strawberries over the whipped cream.
Gently roll the cake back up, using the towel to help guide it.
Step 6: Decorate and Serve
Pipe whipped cream swirls on top for an elegant touch.
Arrange fresh strawberry slices along the top for a vibrant look.
Lightly dust with powdered sugar for a delicate finish.
Optionally, drizzle strawberry jam over the top for extra flavor.
Decoration Tips:
Even Rolling: Roll the sponge while it’s warm to prevent cracking, and unroll it gently when adding the filling.
Clean Swirls: Use a star-tip piping bag for decorative whipped cream swirls on top.
Strawberry Placement: Arrange whole and halved strawberries in a pattern to make the roll visually appealing.
Powdered Sugar Dusting: Use a fine sieve to sprinkle an even layer without clumps.
Serving Style: Present on a white or glass serving platter to highlight the cake’s delicate textures.
3 Matcha Strawberry Cake A Delightful Treat for Every Celebration

Ingredients:
For the Matcha Sponge Cake:
250g all-purpose flour
2 tbsp matcha powder
2 ½ tsp baking powder
½ tsp salt
200g granulated sugar
4 large eggs
120ml vegetable oil
180ml whole milk
1 tsp vanilla extract
1 tbsp lemon juice
For the Whipped Cream Filling:
400ml heavy whipping cream
50g powdered sugar
1 tsp vanilla extract
For the Strawberry Layer:
250g fresh strawberries, chopped
2 tbsp granulated sugar
1 tsp lemon juice
For Decoration:
Whole and halved fresh strawberries
Extra whipped cream for piping
Instructions:
Step 1: Prepare the Matcha Sponge Cake
Preheat your oven to 175°C (350°F). Grease and line three 8-inch cake pans with parchment paper.
In a bowl, sift together the flour, matcha powder, baking powder, and salt. Set aside.
In another large bowl, beat the eggs and sugar until pale and fluffy.
Add the vegetable oil, vanilla extract, and lemon juice, and mix well.
Gradually alternate adding the dry ingredients and milk, mixing until just combined. Avoid overmixing.
Divide the batter evenly between the cake pans and bake for 18-22 minutes or until a toothpick inserted in the center comes out clean.
Let the cakes cool in the pans for 10 minutes, then transfer to a wire rack to cool completely.
Step 2: Prepare the Strawberry Layer
Toss the chopped strawberries with sugar and lemon juice. Let them sit for 10 minutes to release juices.
Step 3: Prepare the Whipped Cream
In a cold mixing bowl, whip the heavy cream, powdered sugar, and vanilla extract until stiff peaks form.
Keep the whipped cream chilled until ready to use.
Step 4: Assemble the Cake
Place one matcha sponge layer on a serving plate.
Spread a generous layer of whipped cream and arrange chopped strawberries on top.
Repeat with the second cake layer, adding more whipped cream and strawberries.
Place the final cake layer on top and cover the entire cake with a smooth layer of whipped cream.
Step 5: Decorate and Serve
Pipe extra whipped cream along the edges for a decorative touch.
Arrange fresh strawberries on top for a vibrant and elegant presentation.
Chill for at least 1 hour before slicing to set the layers.
Decoration Tips:
Even Layers: Trim the cake layers with a serrated knife for a smooth, professional look.
Whipped Cream Stability: Use cold equipment and avoid over-whipping to maintain a light, airy texture.
Balanced Garnish: Arrange strawberries in a natural pattern for a visually appealing design.
Elegant Presentation: Serve on a white or marble cake stand to highlight the contrast of green and red.
Extra Shine: Lightly brush strawberries with a touch of honey for a glossy effect.
2 Strawberry Lemon Cake A Refreshing Delight for Every Celebration

Ingredients:
For the Lemon Sponge Cake:
250g all-purpose flour
2 ½ tsp baking powder
½ tsp salt
200g granulated sugar
100g unsalted butter, softened
2 large eggs
120ml whole milk
1 tbsp lemon zest
2 tbsp lemon juice
1 tsp vanilla extract
For the Strawberry Buttercream Frosting:
200g unsalted butter, softened
400g powdered sugar
3 tbsp strawberry puree
1 tsp vanilla extract
1-2 tbsp milk (if needed for consistency)
For Decoration:
Whole and halved fresh strawberries
Lemon zest curls
Extra whipped cream for piping
Instructions:
Step 1: Prepare the Lemon Sponge Cake
Preheat your oven to 175°C (350°F). Grease and line three 8-inch cake pans with parchment paper.
In a bowl, whisk together the flour, baking powder, salt, and lemon zest. Set aside.
In another large bowl, beat the butter and sugar until light and fluffy.
Add the eggs one at a time, mixing well after each addition. Stir in the lemon juice and vanilla extract.
Gradually alternate adding the dry ingredients and milk, mixing until just combined. Avoid overmixing.
Divide the batter evenly between the cake pans and bake for 18-22 minutes or until a toothpick inserted in the center comes out clean.
Let the cakes cool in the pans for 10 minutes, then transfer to a wire rack to cool completely.
Step 2: Prepare the Strawberry Buttercream Frosting
In a mixing bowl, beat the softened butter until smooth and creamy.
Gradually add the powdered sugar, beating on low speed until combined.
Add the strawberry puree and vanilla extract, then mix on medium speed until fluffy.
If needed, add a tablespoon of milk to adjust the consistency.
Step 3: Assemble the Cake
Place one lemon sponge layer on a serving plate.
Spread a generous layer of strawberry buttercream evenly across the cake.
Repeat with the second cake layer, adding more frosting.
Place the final cake layer on top and cover the entire cake with a smooth layer of buttercream.
Step 4: Decorate and Serve
Pipe whipped cream swirls along the edges for a decorative touch.
Arrange fresh strawberries on top for a vibrant and elegant presentation.
Sprinkle with lemon zest curls for added contrast.
Chill for at least 1 hour before slicing to set the layers.
Decoration Tips:
Smooth Buttercream: Use a spatula to create a neat finish, and chill the cake before final smoothing.
Whipped Cream Piping: Use a star-tip piping bag for decorative swirls.
Balanced Garnish: Arrange whole and halved strawberries evenly for a natural yet elegant look.
Lemon Zest for Freshness: Sprinkle zest lightly over the cake for an extra pop of flavor and color.
Serving Presentation: Plate on a white or pastel-colored cake stand to highlight the cake’s soft hues.
1 Strawberry Pound Cake A Sweet Delight for Every Occasion

Ingredients:
For the Pound Cake:
250g all-purpose flour
1 ½ tsp baking powder
½ tsp salt
200g unsalted butter, softened
200g granulated sugar
4 large eggs
1 tsp vanilla extract
120ml whole milk
1 tbsp lemon juice
For the Strawberry Glaze:
200g fresh strawberries, chopped
3 tbsp granulated sugar
1 tsp lemon juice
1 tsp cornstarch mixed with 1 tbsp water
For Decoration:
Whole and sliced fresh strawberries
Powdered sugar for dusting
Instructions:
Step 1: Prepare the Pound Cake
Preheat your oven to 175°C (350°F). Grease and flour a bundt or round cake pan.
In a bowl, whisk together the flour, baking powder, and salt. Set aside.
In a large mixing bowl, beat the butter and sugar until light and fluffy.
Add the eggs one at a time, mixing well after each addition. Stir in the vanilla extract.
Gradually alternate adding the dry ingredients and milk, mixing until just combined. Avoid overmixing.
Pour the batter into the prepared cake pan and smooth the top.
Bake for 45-50 minutes, or until a toothpick inserted in the center comes out clean.
Let the cake cool in the pan for 10 minutes, then transfer to a wire rack to cool completely.
Step 2: Prepare the Strawberry Glaze
In a saucepan, heat the chopped strawberries, sugar, and lemon juice over medium heat.
Mash the strawberries while stirring, allowing them to release their juices.
Stir in the cornstarch mixture and cook until the glaze thickens.
Remove from heat and let it cool before using.
Step 3: Assemble and Decorate the Cake
Place the cooled pound cake on a serving plate.
Pour the strawberry glaze over the top, letting it gently drip down the sides.
Arrange fresh strawberries on top for a beautiful presentation.
Lightly dust with powdered sugar for an elegant finish.
Decoration Tips:
Smooth and Even Glaze: Let the strawberry glaze cool slightly before pouring to achieve a controlled drip effect.
Strawberry Placement: Arrange whole strawberries in the center and sliced ones around the edges for a balanced design.
Powdered Sugar Finish: Use a fine sieve to evenly dust powdered sugar for a bakery-style touch.
Serving Style: Present on a classic white or gold-trimmed plate for an elegant appearance.
Extra Shine: Lightly brush strawberries with honey for a glossy effect.
SAVE THIS POST TO YOUR FAVORITE PINTEREST BOARD!